 Black Belt
 DeepTrading with TensorFlow
Do you want to maximize your trading knowledge using TensorFlow? Here are several tips that will surely help you.
Introduction
Within TodoTrader’s commitment related to the generation and dissemination of knowledge, I want to offer a series of tutorials on the use of TensorFlow for algorithmic trading.
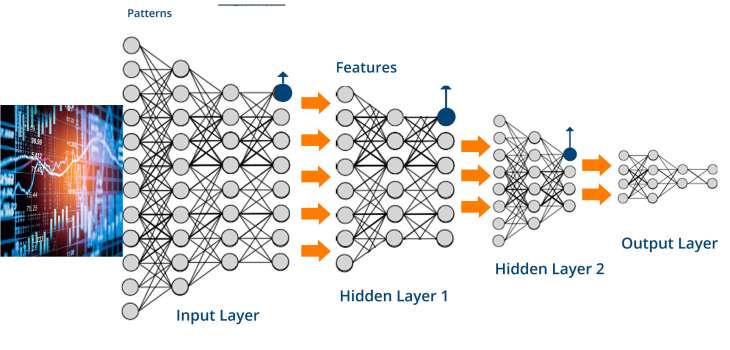
The objective of these tutorials, which I will publish periodically, is to offer in a simple and didactic way, through practical examples, the basics and basic concepts essential for the task of algorithmic trading. At the end of the series, we will have developed an application that allows creating a neural network in TensorFlow, trainable and able to perform operations in the financial markets.
How TensorFlow Works
The complexity of the financial markets has forced to create trading strategies based on artificial intelligence (AI) models. The last ones require a large amount of computing and deep learning algorithms can easily need tens of millions of parameters and billions of connections. Algorithmic trading is full of data and calculations with the data. To deal with it, tensors (multidimensional data arrays) are ideal mathematical entities. And Tensorflow is the right software to use tensors. The training and use of those models require enormous computational resources, in addition, the TensorFlow library allows one to concentrate on the creativity of its solution and leave the infrastructure aside.
TensorFlow was open-sourced in November 2015. Since the inception date, TensorFlow has become Github’s most prominent machine learning repository. (https://github.com/tensorflow/tensorflow)
TensorFlow’s popularity is due to many things, but mainly because of the computational graph concept and the adaptability of the Tensorflow python API structure. This makes solving real problems with TensorFlow accessible to most programmers, even the beginner ones.
You can get all these tutorials in my Github repository:
https://github.com/parrondo/deeptrading
How TensorFlow Operates
Basics of TensorFlow is that first, we create a model which is called a computational graph with TensorFlow objects then we create a TensorFlow session in which we start running all the computation. This tutorial will talk you through pseudocode of how a Tensorflow algorithm usually works.
Tensorflow is supported on the three principal OS systems (Windows, Linux, and Mac). Throughout these Jupyter notebooks, we will only concern ourselves with the Python library wrapper of Tensorflow. This book will use Python 3.X (https://www.python.org) and Tensorflow 0.10+ (https://www.tensorflow.org). Tensorflow can run on the CPU, but it runs faster if it runs on the GPU, and it is supported on graphics cards with NVidia Compute Capability 3.0+. To run on a GPU, you will also need to download and install the NVidia Cuda Toolkit (https://developer.nvidia.com/cuda-downloads).
As usual, we use Conda environments to develop our code (https://github.com/parrondo/quant-trading-project-structure). Please look into the file inside the main directory of this repository, <em>environment.yml</em>, and run the
$ conda env create --file environment.ymlSo you
Important Note: As I mentioned in my previous post, Build TensorFlow from Source in Centos 7, the binary files of TensorFlow for Linux is only available in Conda for CPU up to version 1.5. Therefore I preferred to limit the notebooks to this version to avoid possible problems for readers. However, these examples have been tested until the stable released version 1.12 working perfectly (compiled by me for CPU).
General TensorFlow Algorithm Workflow
Here we introduce the general workflow of TensorFlow Algorithms. This workflow can be
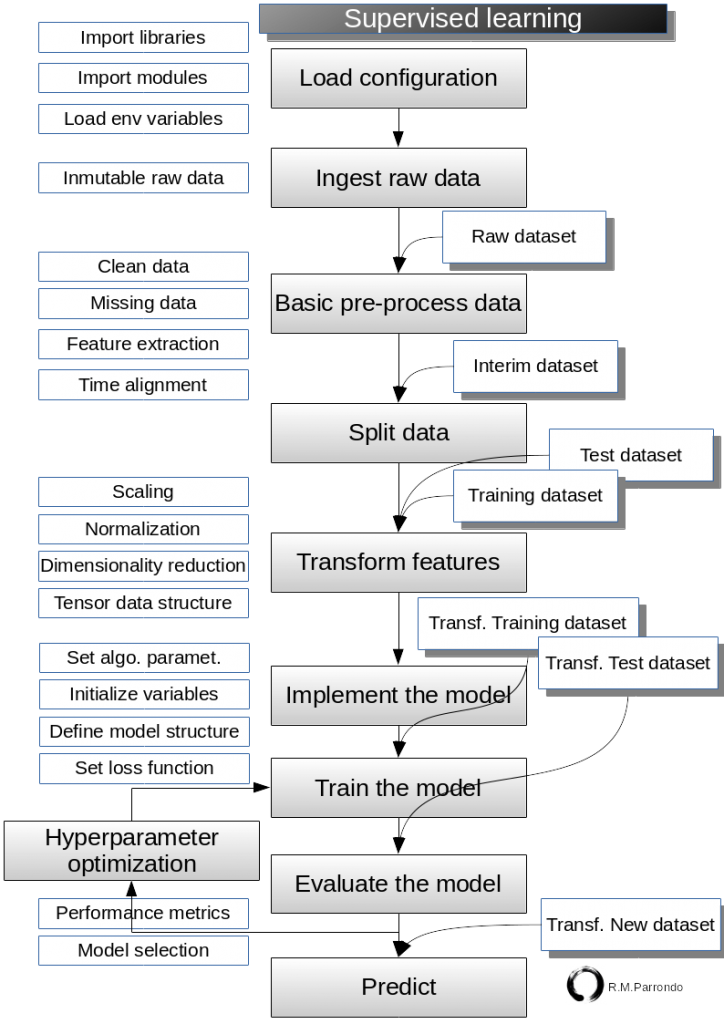
Load configuration
This is usually the first step. Here you import libraries and modules as needed. Also, load environment variables and configuration files.
Ingest data
All of machine learning algorithms depend on data. So, we either generate data or use an outside source of data. Sometimes it is better to rely on generated data because we will want to test the expected outcome. Most times we will access market data sets for the given research. in any case, it is convenient to have a
Output: raw dataset files under “data/raw” folder.
Basic pre-process data
The raw dataset usually has faults which difficult the next steps. In these steps, we proceed to clean data, manage missing data, define features and labels, encode the dependent variable and dataset time alignment when necessary.
Split data
This step is useful when you need to separate data into training and test sets. We can also customize the way to divide the data. Sometimes we need to support data randomization; but, a certain type of data or model type needs the design of other split methods.
Output: two dataset training dataset and test dataset, usually they are resident in memory but in case we need to save them, then “data/interim” is our folder.
Transform features
In general, the data is not in the correct dimension, structure or type expected by our TensorFlow trading algorithms. We have to transform the raw or provisional (interim) data before we can use them. Most algorithms also expect standardized (normalized) data and we will do this here as well. Tensorflow has built-in functions that can normalize the data for you.
data = tf.nn.batch_norm_with_global_normalization(...)Caution! Some algorithms require normalization of the data before training a model. Other algorithms, on the other hand, perform their own data scale or normalization. So, when choosing an automatic learning algorithm to use in a predictive model, be sure to review the algorithm data requirements before applying the normalization to the training data.
This stage include dimension reduction, when necessary.
Finally, in this step, we must have clear what will be the structure (dimensions) of the tensors that are involved in the input of data and in all calculations.
Output: two datasets transformed training dataset and transformed test dataset. It may be, this step is accomplished several times given several pairs of train-test datasets (i.e. normalized dataset, PCA dataset, standardized dataset,…)
Implement the model
Several sub-process expected here, describing as follow:
Set algorithm parameters
Algorithms usually have a set of parameters that we hold constant throughout the procedure (i.e. the number of iterations, the learning rate, or other fixed parameters). It is a good practice to initialize these together so the user can easily find them.
learning_rate = 0.005
a = b
iterations = 1000
epochs=50
Initialize variables and placeholders
we have to tell Tensorflow what it can and cannot modify. TensorFlow will modify the variables during optimization to minimize a loss function. To accomplish this, we feed in data through placeholders. Placeholder simply allocates a block of memory for future use. By default, placeholder has an unconstrained shape, which allows us to feed tensors of different shapes in a session. We need to initialize variables and define size and type of placeholders so that TensorFlow knows what to expect.
k_var = tf.constant(50)
x_train = tf.placeholder(tf.float32, [None, input_size])
y_train = tf.placeholder(tf.fload32, [None, num_classes])
Define the model structure
After we have the data and initialized variables and set placeholders, we have to define the model. This is done by mean of the powerful concept of a computational graph. The graph nodes represent mathematical operations, while the graph edges represent the multidimensional data arrays (tensors) that flow between them. We tell Tensorflow what operations must be done on the variables and placeholders to get our model predictions. Most TensorFlow programs start with a dataflow graph construction phase. In this phase, we invoke TensorFlow API functions that construct new tf.Operation (node) and tf.Tensor (edge) objects and add them to a
y_pred = tf.add(tf.mul(x_input, weight_matrix), b_matrix)Set loss functions
After defining the model, we must be able to evaluate the output. THere we set the loss function. The loss function is very important a tells us how far off our predictions are from the actual values. There are several types of loss functions
loss = tf.reduce_mean(tf.square(y_actual – y_pred))Train the model
Now that we have everything in place, we create an instance or
with tf.Session(graph=graph) as session:
     ...
     session.run(...)
     ...
Note that we can also initiate our graph with:
# Using the "close()" method.
 sess = tf.Session(graph=graph)
 sess.run(...)
 sess.close()
 ...
Output: Trained model which is stored in the folder “models”
Evaluate the model
Once we have built and trained the model, we should evaluate the model by looking at how well it does on new data known as test data.
Hyperparameter optimization
This is not a mandatory step but it is convenient. The initial neural network is probably not the optimal one. So here we can tweak a bit in the parameters of the network to try to improve them. Then train an evaluate again and again until meet the optimization condition. As result, we get the final selected network. Output: Final selected trained model which is stored in the folder “models”
Predict
Yeees, this is the climax of our work!. We want to predict as much as possible, It is also important to know how to make predictions on new, unseen, data. The readers can do this with all the models, once we have them trained. So, We could say that this is the goal of all our algorithmic trading efforts. Output: A prediction. This will help us what to do with a selected financial instrument: Buy, Hold, Sell,…
Summary
TensorFlow is an open source software library for numerical computation using data flow graphs. To work with it, we have to setup the data, variables, placeholders, and model before we tell the program to train. Tensorflow accomplishes this through the computational graph. The graph nodes represent mathematical operations, while the graph edges represent the multidimensional data arrays (tensors) that flow between them. We tell it to minimize a loss function and Tensorflow does this by modifying the variables in the model. Tensorflow knows how to modify the variables because it keeps track of the computations in the model and automatically calculates the gradients for every variable.
TensorFlow algorithms are designed to have a cyclic workflow. We set up this cycle as a computational graph and (1) feed in data through the placeholders, (2) calculate the output of the computational graph, (3) compare the output to the desired output with the aid of a loss function, (4) modify the model variables according to the automatic back propagation, and finally (5) repeat the process until a stopping criterion is met. (6) Then we evaluate the trained model and if we are confortable with it finally (6) we make predictions.
Remember all these TensorFlow tutorials will be in my github repository:


2 COMMENTS
Hello Sir, thanks a lot for the incredible blog!
In the beggining, right in the environment.yml file it tels that the project structure is setted for python 3.5, but can I use it with python 3.7?
Thanks in advance 🙂
Hi, just a person,
The tutorial series is based on Anaconda distribution. You have the flexibility to use the different python versions in different environments so you could test. When I start to use a tutorial, which is not mine, I do exactly what the owner does. Then when I am familiar with it, I usually make a lot of changes to be comfortable and adapt it to my programming philosophy.
On the other hand, Tensorflow is very dependent on the python version, even its versions. That’s why I use an old (but robust) version of Tensorflow here (for more information, see post: https://todotrader.com/build-tensorflow-from-source-in-centos-7/). I do not think you could use Tensorflow 1.5 with python 3.7 easily, but just try!