 Black Belt
 Deep Trading with TensorFlow VIII
Introduction
After training and testing your model, you had a great question: how will you deploy the model and make predictions for new data samples? Luckily for us, TensorFlow was developed for production, and it provides a robust solution for model deployment, known as TensorFlow Serving. In this approaching, we have three steps:
- Export your model from Tensorflow for serving (production repository)
- Create and launch a Docker container with your model (Tensorflow server for model hosting)
- Deploy it with Kubernetes into a cloud platform, (example Google Cloud, Amazon AWS, or Azure Kubernetes Services AKS). This deployment option is more professional but not included in this tutorial.
Credits to the kind people wich own the References for this tutorial.
You can get all files related to this tutorial in my github repository:
https://github.com/parrondo/deeptrading-tfserving-python (NOT YET AVAILABLE!! But it will be soon)
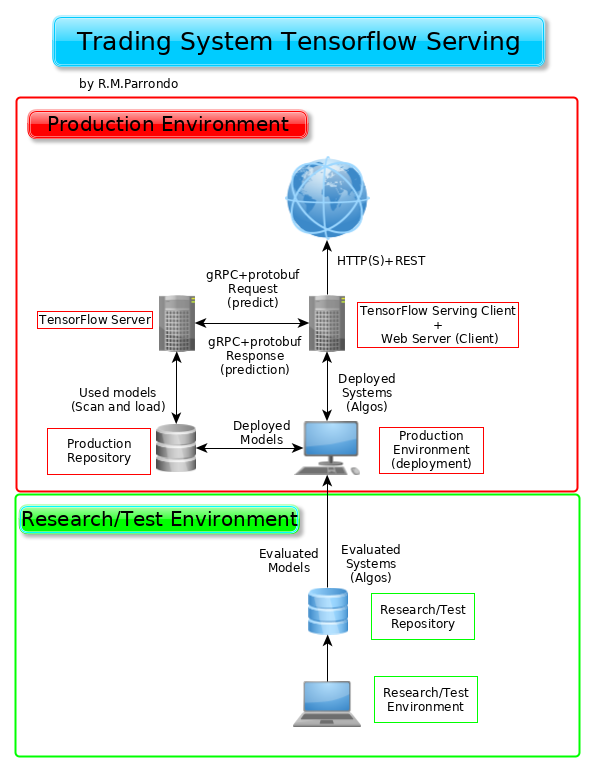
Trading system Tensorflow serving
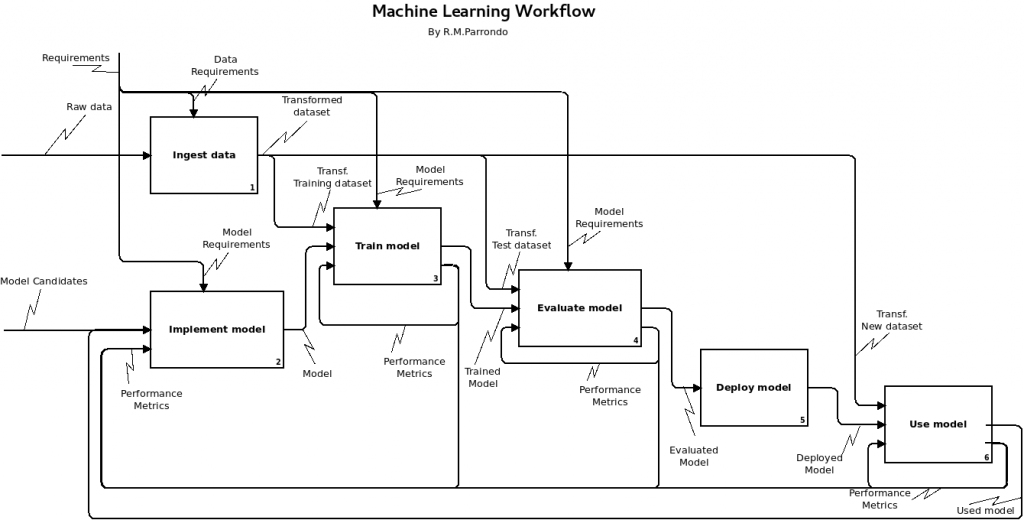
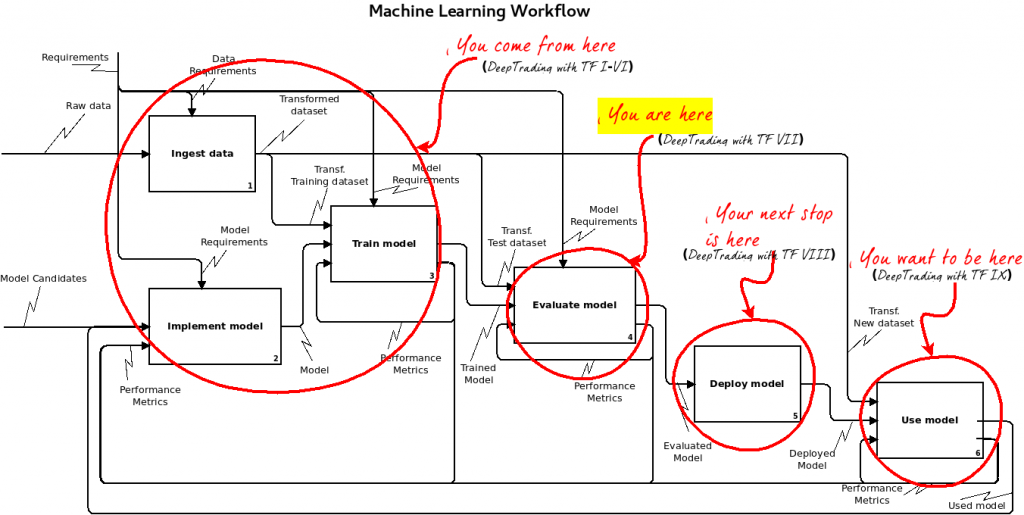
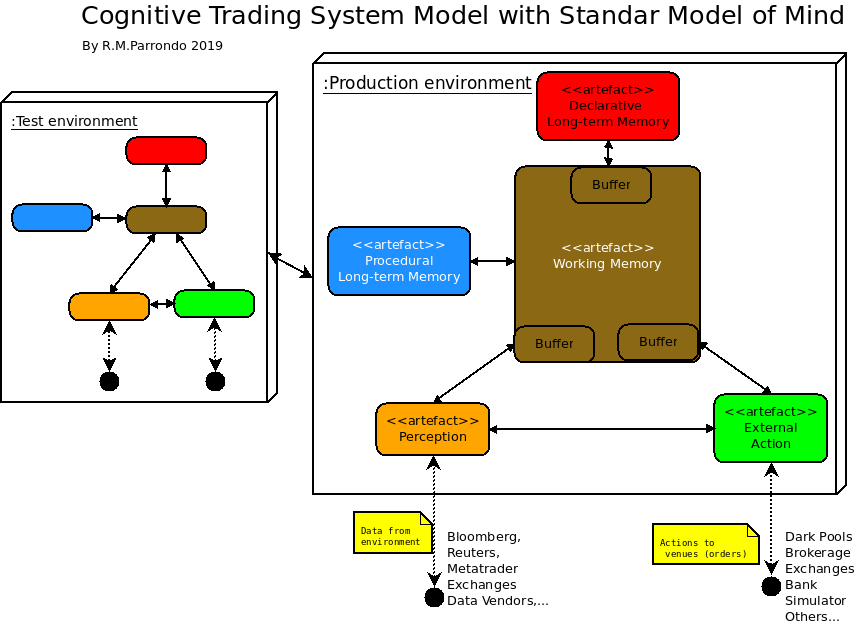
Below we can see the components explained in this tutorial for deploying trading systems with Tensorflow serving. We will use the model of Deep Trading with TensorFlow VI, but you can use whatever model you train. The workflow is as follows:
TensorFlow
Well, you perfectly know what TensorFlow is: an open-source library for the development of Machine Learning and especially Deep Learning models created and supported by Google. We create the model with Tensorflow in our research/test environment and write it in our research/test repository of models.
Docker
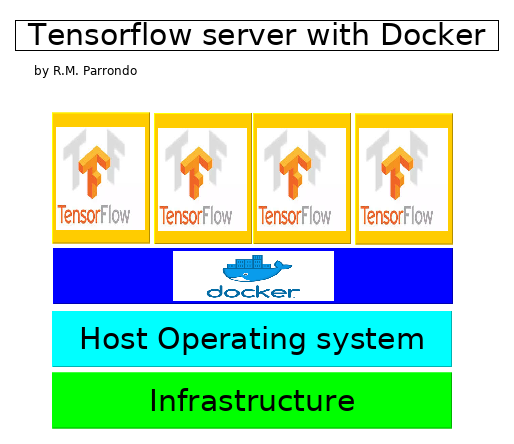
Docker is a containerization engine and provides a convenient way to pack your stuff with all dependencies together to be deployed locally or in the cloud. The documentation is very comprehensive and you should check it for the details. We will use the
TensorFlow Serving
TensorFlow Serving hosts the model and provides remote access to it. TensorFlow Serving has proper documentation on its architecture and useful tutorials. Unfortunately, they are using simple examples and get a little explanation, what you need to do for your trading models to be served.
Tensorflow Serving has two funny issues. On the one hand, the server implements a gRPC interface, so we need to create a client, which can communicate over gRPC. On the other hand, it provides operations on models stored as Protobuf.
Proto…what? Yes, Protocol Buffers (or Protobuf), which allows efficient data serialization. It is an open-source piece by Google 🙂
Below is the caption of the proposed Tensorflow server.
Kubernetes
Kubernetes is an open-source software created at Google, and it provides container orchestration, allowing you automated horizontal scaling, service discovery, load balancing, and more. So, it automates the management of your web services in the cloud.
Save our model
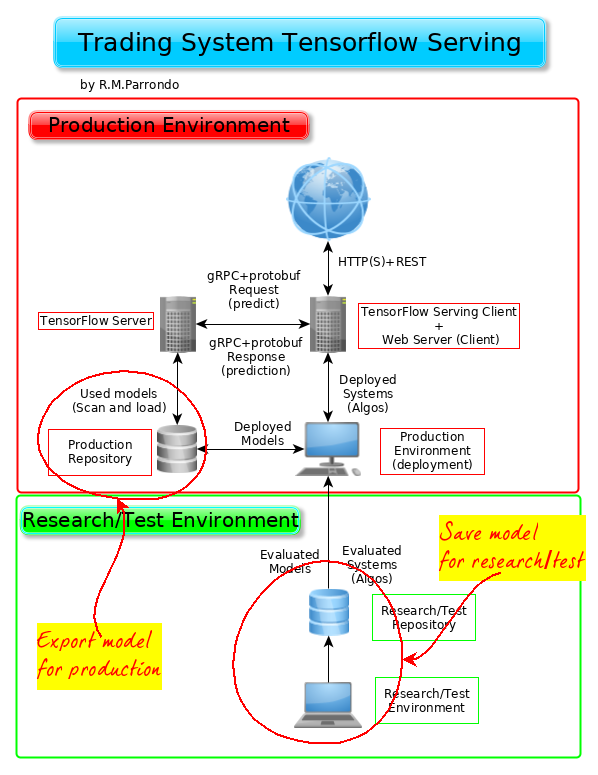
We have written our model when running the tutorial VI. In the snippets below, we have extracted the line to write the model for research/test and production environments.
We pass the pathname where we want the model stored to the builder. The last part of the path is the model version. We use it when retraining the model on real data.
TIP: Do not forget to delete all versions you don’t need.
The model path has two possibilities controlled with the boolean variable “to_production”:
For research/test environment is:
model_path = model_dir+”07_First_Forex_Prediction”
# Save model weights to disk
save_path=saver.save(sess,model_path)
print("Model saved in file: %s"%save_path)
print("First Optimization Finished!")
For production environment is:
production_model_path = production_dir+"models/"+"07_First_Forex_Prediction"# Running a new session for predictions and export model to production
print("Starting prediction session...")
with tf.Session() as sess:
# Initialize variables
sess.run(init)
# Try to restore a model if any.
try:
saver.restore(sess, model_path)
print("Model restored from file: %s" % model_path)
# We try to predict the close price of test samples
feed_dict = {X: X_test_std}
prediction = sess.run(y_hat, feed_dict)
print(prediction)
%matplotlib inline
# Plot Prices over time
plt.plot(y_test, 'k-', label='y_test')
plt.plot(prediction, 'r--', label='prediction')
plt.title('Price over time')
plt.legend(loc='upper right')
plt.xlabel('Time')
plt.ylabel('Price')
plt.show()
if to_production:
# Pick out the model input and output
X_tensor = sess.graph.get_tensor_by_name("X"+ ':0')
y_tensor = sess.graph.get_tensor_by_name("out_layer" + ':0')
model_input = build_tensor_info(X_tensor)
model_output = build_tensor_info(y_tensor)
# Create a signature definition for tfserving
signature_definition = signature_def_utils.build_signature_def(
inputs={"X": model_input},
outputs={"out_layer": model_output},
method_name=signature_constants.PREDICT_METHOD_NAME)
model_version = 1
export_model_dir = production_model_path+"/"+str(model_version)
while os.path.exists(export_model_dir):
model_version += 1
export_model_dir = production_model_path+"/"+str(model_version)
builder = saved_model_builder.SavedModelBuilder(export_model_dir)
builder.add_meta_graph_and_variables(sess,
[tag_constants.SERVING],
signature_def_map={
signature_constants.DEFAULT_SERVING_SIGNATURE_DEF_KEY:
signature_definition})
# Save the model so we can serve it with a model server :)
builder.save()
except Exception:
print("Unexpected error:", sys.exc_info()[0])
pass
Obviously, “07_First_Forex_Prediction” is the name of the model. Feel free to change the name at your convenience, but I recommend you stick to a naming rule.
In the example above (see complete code in Deep Trading with TensorFlow V) we created the placeholders, and operations on the default graph. Then we started a session and ran the operations.
It’s time to save the model. Here’s an outline for the code:
- We have to define the input and output tensors. See lines below # Pick out the model input and output
- Create a signature definition from the input and output tensors. The signature definition is what the model builder uses to save something a model server can load. See lines below # Create a signature definition for tfserving
First we have to figure out which nodes are input and output nodes. From our deep math model we can grab input tensor:
X = tf.placeholder(dtype=tf.float32, shape=[None, n_features], name="X")and output tensor:
out_layer = tf.nn.relu(tf.add(tf.matmul(layer_4, variables['W5']), variables['bias5']), name="out_layer")The names “X” and “out_layer” are the strings defining the input and output placeholders of our model. We can use whatever strings we like to name the input and output of your models; ‘inputs’ and ‘outputs’ are also proper names. TensorFlow has defined some constants for us that we can use. The definition of these constants are in signature_constants.py, and there are three sets of constants: predictions, classification, and regression. If you peek into signature_constants.py we’ll see that the input and output constants are ‘inputs’ and ‘outputs.’
A place where we have to use a string that TensorFlow has defined is the third keyword parameter called method_name. It must be one of tensorflow/serving/predict, tensorflow/serving/classify, tensorflow/serving/regress. They also defined in signature_constants.py as:
CLASSIFY_METHOD_NAME
PREDICT_METHOD_NAME
REGRESS_METHOD_NAME.
It is not clear why we need this to save the model, and the documentation is quite weak here. The model server will give you an error if you don’t use one of these constants.
Run the code, and we should have our model ready for serving. If the code runs without errors, you can find the model in <your_path>/models/07_First_Forex_Prediction/1.
Serving the model
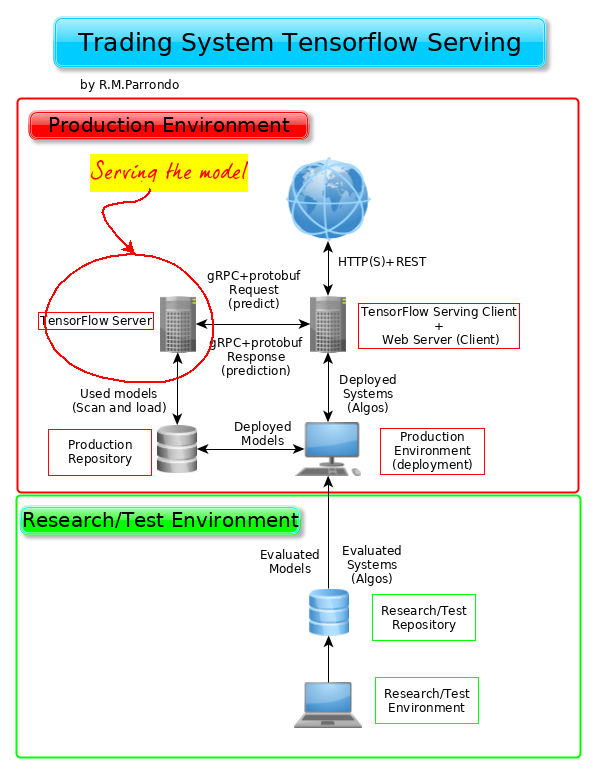
If we finished the previous step without problems, we are ready to serve the model now.
We will use a simple CPU compiled server for this tutorial.
You can find the model server we’re going to use here. You can install it following the instruction for your operating system, but I already recommend a Docker image with the server. We can use the excellent one provided by Bitnami. Their Tensorflow Serving containers are designed to work well together, are well documented, and continuously updated when new versions are made available. I have been using them for years with excellent and robust results.
We recommend Docker Compose, which is a tool for defining and running multi-container Docker applications. It is very versatile. With Compose, we use a YAML file to configure our application’s services. Then, with a single command, you create and start all the services from your configuration. To learn more about all the features of Compose, see the list of features.
The recommended way to get the Bitnami TensorFlow Serving Docker Image is to pull the prebuilt image from the Docker Hub Registry.
$ docker pull bitnami/tensorflow-serving:latestTo serve the model all we need to do is run the file run_model.sh.
The content of the script is
#!/usr/bin/env bash
docker-compose up
# To stop: docker stop tensorflow-serving && docker rm tensorflow-serving
We should see an output like this; if so, we are now serving the model with TensorFlow Serving!
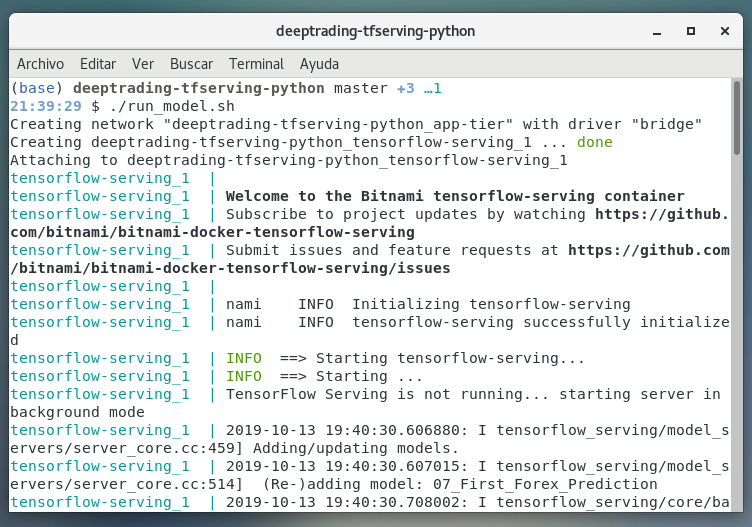
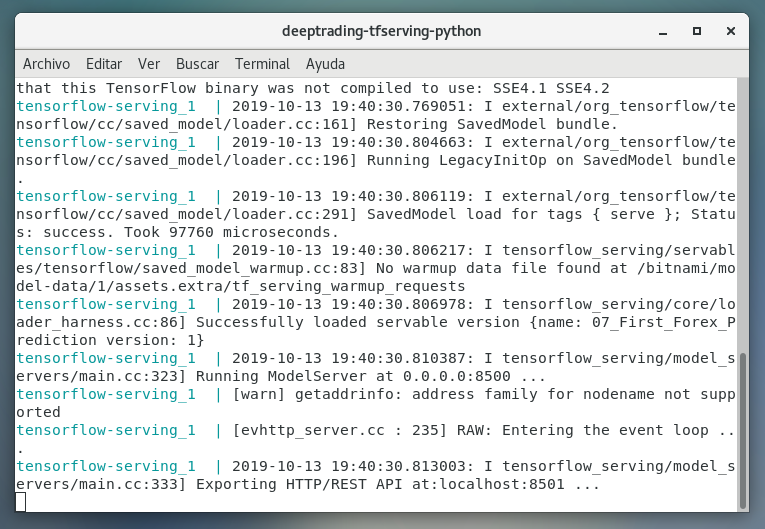
Congrats! You are now serving a model with TensorFlow Serving.
The model server runs a gRPC service, and we’ll tell you need to know about it and how to send requests.
To stopping the server you need to open a new terminal tab and run:
./stop_model.sh
The content of the script is:
#!/usr/bin/env bash
docker-compose down -v
and the results are:

Send predictions requests to your model
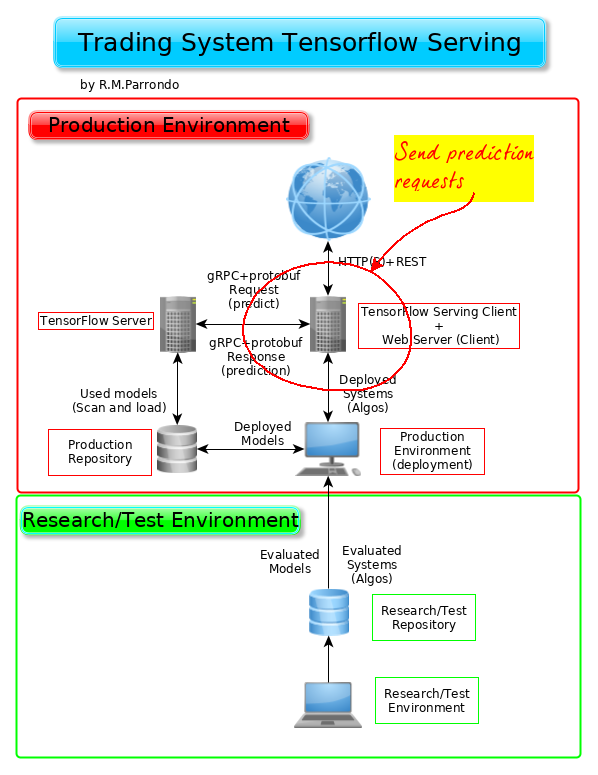
You don’t need to understand or know anything about gRPC to complete this tutorial. Of course that knowledge is important if you want to modify the code.
For now, let’s focus on using a client built by Epigram AI from this Github repository (All credits to the author):
https://github.com/epigramai/tfserving-python-predict-client
The client works without TensorFlow installed. So create a new environment using conda or virualenv (or similar environment tool.)
We
Come on and install the client:
As usual, we use the terminal or an Anaconda Prompt for the following steps:
$ <em>conda create --name myenv</em>
<em>$ conda activate myenv</em><em>(myenv)$ </em><em>pip install
git+https://github.com/parrondo/deeptrading-tfserving-python.git</em>Make sure the model server is running with the model you want to test. Start it again if you stopped the container when we cleaned up with the stop_model.sh script.
Example 1
Below you can see the python file example1.py
#
# Example 1 file
#
# This client sends 3 requests to the Tensorflow server.
# The content of the request data is a numpy array with three columns
# representing three OHLC sample data, to test the version 1 of
# the model '07_First_Forex_Prediction'
# Note the 'in_tensor_name': 'X' which must be the same in your model tensor name.
#
# Author: R.M.Parrondo
#https://github.com/parrondo/deeptrading-tfserving-python
#

import logging
import numpy as np

from predict_client.prod_client import ProdClient

logging.basicConfig(level=logging.DEBUG,
                    format='%(asctime)s - %(levelname)s - %(name)s - %(message)s')

# In each file/module, do this to get the module name in the logs
logger = logging.getLogger(__name__)

# Make sure you have a model running on localhost:8500
host = '0.0.0.0:8500'
model_name = '07_First_Forex_Prediction'
model_version = 1

client = ProdClient(host, model_name, model_version)
data = np.array([[1.87374825, 1.87106024, 1.87083053, 1.86800846],
                 [1.87224386, 1.8729944 , 1.87405399, 1.8712318 ],
                 [1.86558156, 1.86289375, 1.86008567, 1.86521489]])
req_data = [{'in_tensor_name': 'X', 'in_tensor_dtype': 'DT_FLOAT', 'data': data}]

prediction = client.predict(req_data, request_timeout=10)
for k in prediction:
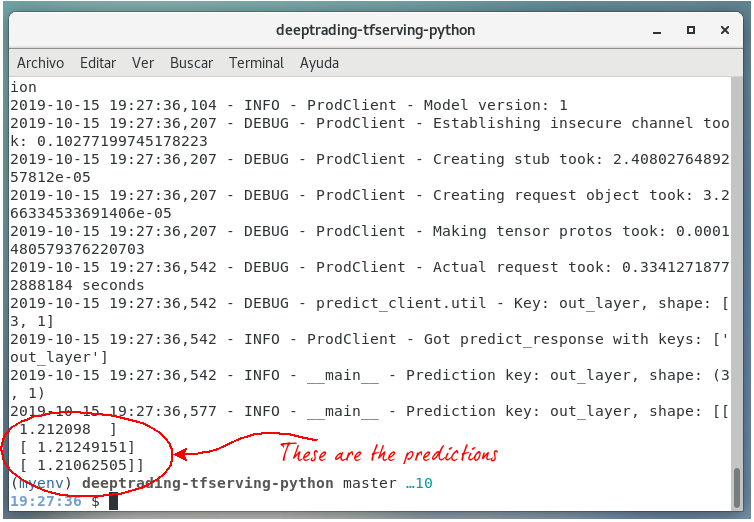
    logger.info('Prediction key: {}, shape: {}'.format(k, prediction[k].shape))
    logger.info('Prediction key: {}, shape: {}'.format(k, prediction[k]))
and the result is:
Example 2
And this is the python file of example2.py
#
# Example 2 file
#
# This client send several requests controled by 'repetitions', to the Tensorflow server.
# The content of the request data is a numpy array with 'repetitions' columns
# representing multipe OHLC sample data, to test the version 1 of
# the model '07_First_Forex_Prediction'
# Note the 'in_tensor_name': 'X' which must be the same in your model tensor name.
#
# Author: R.M.Parrondo
#https://github.com/parrondo/deeptrading-tfserving-python
#

import logging
import numpy as np

from predict_client.prod_client import ProdClient

# generate random floating point values
from random import seed
from random import random

# seed random number generator
seed(1)


logging.basicConfig(level=logging.DEBUG,
                    format='%(asctime)s - %(levelname)s - %(name)s - %(message)s')

# In each file/module, do this to get the module name in the logs
logger = logging.getLogger(__name__)

# Make sure you have a model running on localhost:8500
host = '0.0.0.0:8500'
model_name = '07_First_Forex_Prediction'
model_version = 1

client = ProdClient(host, model_name, model_version)

# Generate random numbers between mini and maxi
repetitions = 10
# Change mini and maxi in order to get prices
mini = 0.9
maxi = 1.5

#Number of repetitions
for _ in range(repetitions):
    # Generating random OHLC data
    o = mini + (random() * (maxi - mini))
    h = o + random()*0.01
    l = o - random()*0.01
    c = (h + l)/2
    # Constructing data array. You can use a batch of M samples.
    # So data must be an array of dimension M x 4
    data = np.array([[o, h, l, c]])

    req_data = [{'in_tensor_name': 'X', 'in_tensor_dtype': 'DT_FLOAT', 'data': data}]
    prediction = client.predict(req_data, request_timeout=10)
    for k in prediction:
        #ram logger.info('Prediction key: {}, shape: {}'.format(k, prediction[k].shape))
        #ram logger.info('Prediction key: {}, shape: {}'.format(k, prediction[k]))
        print("data =", data, "prediction =", prediction[k])
and the corresponding results:

Note you can see only the last prediction in this caption.
And now what?
Well, we can send requests to our model and receive the responses. The next step is receiving real data in our Tensorflow serving client from our broker (or market data suppliers), made actual predictions, and send orders to the broker.
We will use the API of the broker Darwinex, but you can select what you want. The aim of this series is that you have the knowledge you need.
References:
1) https://medium.com/epigramai/tensorflow-serving-101-pt-1-a79726f7c103
2) https://medium.com/epigramai/tensorflow-serving-101-pt-2-682eaf7469e7
3) https://github.com/epigramai/tfserving-python-predict-client
4) https://bitnami.com/stack/tensorflow-serving
5) https://github.com/bitnami/bitnami-docker-tensorflow-serving
6) https://www.tensorflow.org/tfx/serving/serving_basic
9) https://becominghuman.ai/creating-restful-api-to-tensorflow-models-c5c57b692c10?gi=61a4907327ae


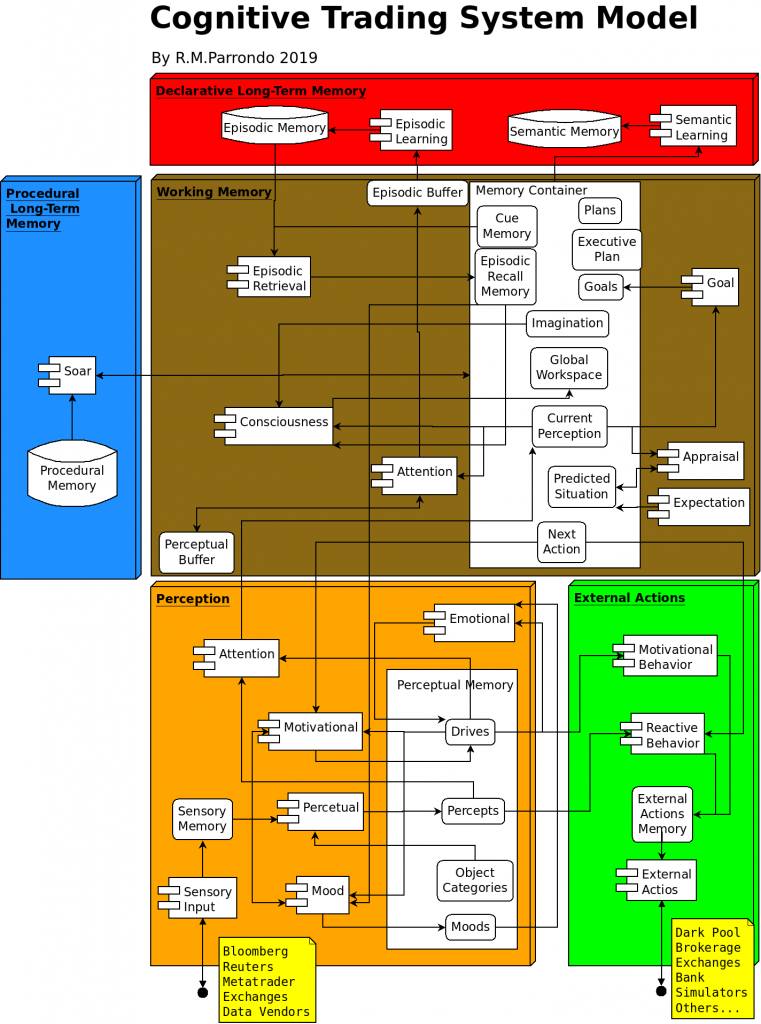
![Figure 3: Cognitive Trading System Model practical application
adapted from the [Reid, 2013] algorithmic trading system architecture.](https://todotrader.com/wp-content/uploads/2019/09/cognitive_trading_system_with_reid_architecture-755x1024.png?x75585)


